Ansible Custom Inventory Plugin - a hands-on, quick start guide
16 Nov 2019This post shows you how to write a custom inventory plugin for Ansible. As usual, this is not a deep dive. If you are interested about what inventory plugins are or why you might want to use them. Please see the Ansible docs. Additionally for an in-depth understanding of inventories in general and inventory plugins in particular I highly recommend these videos:
- Ansible inventory for fun and profit by @Matt Davis
- Managing Meaningful Inventories by @Will Tome and @Alan Rominger
Finally, this post describes my workflow while building custom inventory plugins. This post is better consumed as a “do-it-along”.
My use case
As always we’ll being with a use case :). I have my inventory in a spreadsheet, and I want to use that as the source of truth for my Ansible playbooks. 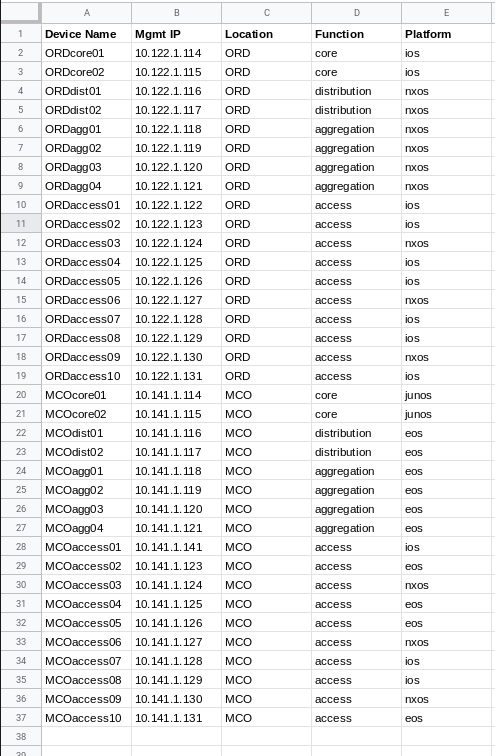 Here’s a link to the CSV version of that spreadsheet:
https://github.com/termlen0/custom-inventory-plugin/blob/master/csv_inventory/myinventory.csv
Here’s a link to the CSV version of that spreadsheet:
https://github.com/termlen0/custom-inventory-plugin/blob/master/csv_inventory/myinventory.csv
We have devices from 2 datacenters in this spreadsheet. The file also describes the function the device performs and the platform type, that are of interest.
Step 1: Write a simple Python program
Our first step is simply to write a Python program that returns the data in the CSV as a JSON object. Why? Because inventory plugins are required to be written in Python and we will use this simple code as the stepping stone for building out the logic in the custom inventory plugin. Here’s a link to the Python code that does this: https://github.com/termlen0/custom-inventory-plugin/blob/master/csv2json.py
Executing this locally as follows:
(ansible) ~/P/m/inventory_plugin » python csv2json.py
Results in the following output:
{
    "MCOcore01": {
        "Function": "core",
        "Mgmt IP": "10.141.1.114",
        "Device Name": "MCOcore01",
        "Location": "MCO",
        "Platform": "junos"
    },
    "ORDaccess07": {
        "Function": "access",
        "Mgmt IP": "10.122.1.128",
        "Device Name": "ORDaccess07",
        "Location": "ORD",
        "Platform": "ios"
    }

    ...
    ...
}
This code is a ripoff from my first google search hit
We now have a nice structured object with all our inventory information that we can plug into the inventory plugin!
NOTE: This could be data coming back from an external source of truth rather than the CSV file
Step 2: Writing the custom inventory file.
Now, we’ll start moving pieces from the above code into our custom inventory plugin. There are 2 parts to writing a custom inventory plugin:
- The inventory file: A YAML file that describes the plugin amongst other things
- The plugin python file: A Python file that follows Ansible plugin requirements
The inventory file, at the very least contains the name of the plugin. Think of this file as the user interface for the Python file. This is where the consumer of your plugin can send instructions to the Python file. For our example let’s begin with the following file:
---
#csv_inventory.yaml

plugin: my_csv_plugin            # Name of the plugin
path_to_inventory: csv_inventory # Directory location of CSV
csv_file: myinventory.csv        # Name of the inventory file
Link to file in the repo.
I’m calling this plugin, very creatively, my_csv_plugin. I’m defining the location and filename of the CSV file, the plugin should parse, to generate the dynamic inventory. For a user of this plugin, this file allows them to customize these options (except the name).
NOTE: This file is now the inventory input to the ansible-playbook command and therefore should follow the same rules of placement within the playbook directory
Other advanced options like
composeandkeyed_groupsare also supported.
Step 3: Onto the Python Skeleton Code
The Ansible developer guide provides us with skeleton code to get started. If you are following along, create a directory named inventory_plugins and copy and paste the following code there.
#my_csv_plugin.py

from __future__ import (absolute_import, division, print_function)
__metaclass__ = type

DOCUMENTATION = r'''
    name: my_csv_plugin
    plugin_type: inventory
    short_description: Returns Ansible inventory from CSV
    description: Returns Ansible inventory from CSV
    options:
      plugin:
          description: Name of the plugin
          required: true
          choices: ['my_csv_plugin']
      path_to_inventory:
        description: Directory location of the CSV inventory
        required: true
      csv_file:
        description: File name of the CSV inventory file
        required: true
'''


from ansible.plugins.inventory import BaseInventoryPlugin
from ansible.errors import AnsibleError, AnsibleParserError


class InventoryModule(BaseInventoryPlugin):
    NAME = 'my_csv_plugin'


    def verify_file(self, path):
        '''Return true/false if this is possibly a valid file for this plugin to
consume

        '''
        pass

    def parse(self, inventory, loader, path, cache):
       '''Return dynamic inventory from source '''
       pass
Key things to note:
-
The DOCUMENTATION section is required and used by the plugin. Note how the options here reflect exactly the options we specified in the
csv_inventory.yamlfile in the previous step. -
The NAME should exactly match the name of the plugin everywhere else.
-
For details on the imports and base classes/helpers, please watch the videos I linked at the top of this blog. (This is a quick start guide ;))
At this point, our playbook directory listing looks as follows:
.
├── csv2json.py
├── csv_inventory
│   └── myinventory.csv
├── csv_inventory.yaml
├── inventory_plugins
│   └── my_csv_plugin.py
└── README.md
Ansible expects the custom plugin to implement at least the parse method and recommends the verify_file method as a way to validate user input. So our
job is to start building these.
Step 4: Write the “verify_file” method.
This can be as simple or as complex as you’d like. Let’s keep things simple and make sure that the inventory YAML file name is one that’s acceptable to this plugin. Update the verify_file method in our Python code to do that:
# Update the verify_file method

    def verify_file(self, path):
        '''Return true/false if this is a
        valid file for this plugin to consume
        '''
        valid = False
        if super(InventoryModule, self).verify_file(path):
            #base class verifies that file exists
            #and is readable by current user
            if path.endswith(('csv_inventory.yaml',
                              'csv_inventory.yml')):
                valid = True
        return valid
Step 5: Write the “parse” method.
Here is the workflow I use to build the parse method:
1. Read in the inventory YAML file and collect the options
    def parse(self, inventory, loader, path, cache):
       '''Return dynamic inventory from source '''
       super(InventoryModule, self).parse(inventory, loader, path, cache)
       # Read the inventory YAML file
       self._read_config_data(path)
       try:
           # Store the options from the YAML file
           self.plugin = self.get_option('plugin')
           self.inv_dir = self.get_option('path_to_inventory')
           self.inv_file = self.get_option('csv_file')
       except Exception as e:
           raise AnsibleParserError(
               'All correct options required: {}'.format(e))
       # Call our internal helper to populate the dynamic inventory
       self._populate()
The last line above is calling an internal helper function that we are yet to write.
2. Define the helper function(s)
Add the _populate() helper. As a learning step, let’s simply populate it with a debug checkpoint.
    def _populate(self):
        '''Return the hosts and groups'''
        import pdb; pdb.set_trace()


    def parse(self, inventory, loader, path, cache):
       '''Return dynamic inventory from source '''
       super(InventoryModule, self).parse(inventory, loader, path, cache)
       # Read the inventory YAML file
       self._read_config_data(path)
       try:
           # Store the options from the YAML file
           self.plugin = self.get_option('plugin')
           self.inv_dir = self.get_option('path_to_inventory')
           self.inv_file = self.get_option('csv_file')
       except Exception as e:
           raise AnsibleParserError(
               'All correct options required: {}'.format(e))
       # Call our internal helper to populate the dynamic inventory
       self._populate()
Now let’s run the ansible-inventory command to invoke the debugger and investigate the class object.
(ansible) ~/P/m/inventory_plugin » ansible-inventory -i csv_inventory.yaml --playbook-dir ./ --list
This should take you to the Python debugger REPL. Here you can use normal Python introspection to check the attributes of the class instance:
(Pdb) self.inv_dir
u'csv_inventory'
(Pdb) self.inv_file
u'myinventory.csv'
(Pdb) self.plugin
u'my_csv_plugin'
(Pdb)
Great! so we can see the options being sent into _populate(). Now we can remove the debug checkpoint and bring in the code we wrote in our simple Python CSV to JSON converter. For our example, it can look something like so:
    def _get_structured_inventory(self, inventory_file):

        #Initialize a dict
        inventory_data = {}
        #Read the CSV and add it to the dictionary
        with open(inventory_file, 'r') as fh:
            csvdict = csv.DictReader(fh)
            for rows in csvdict:
                hostname = rows['Device Name']
                inventory_data[hostname] = rows
        return inventory_data

    def _populate(self):
        '''Return the hosts and groups'''
        self.inventory_file = self.inv_dir + '/' + self.inv_file
        self.myinventory = self._get_structured_inventory(self.inventory_file)
        #import pdb; pdb.set_trace()
Use
pdbto set checkpoints along the way to know you are going in the right direction.
NOTE: At this point import csv along with the other imports
3. Build out the parse function
Now that we see structured data coming back, we can start populating the group names and the hostnames. This is relatively straightforward in our example. We are going to create 3 groups.
- One based on the location of the device (First 3 characters = Airport code)
- Two based on the function of the device and
- Three, based on the platform type
The _populate() function now looks as follows:
    def _populate(self):
        '''Return the hosts and groups'''
        self.inventory_file = self.inv_dir + '/' + self.inv_file
        self.myinventory = self._get_structured_inventory(self.inventory_file)
        #Create the location, function and platform  groups
        locations = []
        functions = []
        platforms = []
        for data in self.myinventory.values():
            if not data['Location'] in locations:
                locations.append(data['Location'])
            if not data['Function'] in functions:
                functions.append(data['Function'])
            if not data['Platform'] in platforms:
                platforms.append(data['Platform'])
        for location in locations:
            self.inventory.add_group(location)
        for function in functions:
            self.inventory.add_group(function)
        for platform in platforms:
            self.inventory.add_group(platform)
        #Add the hosts to the groups
        for hostname,data in self.myinventory.items():
            self.inventory.add_host(host=hostname, group=data['Location'])
            self.inventory.add_host(host=hostname, group=data['Function'])
            self.inventory.add_host(host=hostname, group=data['Platform'])
Here, we are taking advantage of the helpers from the base class that allow us to use the add_group and add_host methods to the inventory instance.
You can now test this code by executing the ansible-inventory command as follows:
(ansible) ~/P/m/inventory_plugin » ansible-inventory -i csv_inventory.yaml --playbook-dir ./ --graph                                                 master ✗
@all:
  |--@MCO:
  |  |--MCOaccess01
  |  |--MCOaccess02
  |  ...<omitted for brevity>
  |--@ORD:
  |  |--ORDaccess01
  |  |--ORDaccess02
  |  ...<omitted for brevity>
  |--@access:
  |  |--MCOaccess01
  |  |--MCOaccess02
  |  |--MCOaccess03
  |  ...<omitted for brevity>
  |  |--ORDaccess01
  |  |--ORDaccess02
  |  |--ORDaccess03
  |  ...<omitted for brevity>
  |--@aggregation:
  |  |--MCOagg01
  |  |--MCOagg02
  |  |--MCOagg03
  |  |--MCOagg04
  |  |--ORDagg01
  |  |--ORDagg02
  |  |--ORDagg03
  |  |--ORDagg04
  |--@core:
  |  |--MCOcore01
  |  |--MCOcore02
  |  |--ORDcore01
  |  |--ORDcore02
  |--@distribution:
  |  |--MCOdist01
  |  |--MCOdist02
  |  |--ORDdist01
  |  |--ORDdist02
  |--@eos:
  |  |--MCOaccess02
  |  |--MCOaccess04
  |  |--MCOaccess05
  |  |--MCOaccess10
  |  |--MCOagg01
  |  |--MCOagg02
  |  |--MCOagg03
  |  |--MCOagg04
  |  |--MCOdist01
  |  |--MCOdist02
  |--@ios:
  |  |--MCOaccess01
  |  |--MCOaccess07
  |  |--MCOaccess08
  |  |--ORDaccess01
  |  |--ORDaccess02
  |  |--ORDaccess04
  |  |--ORDaccess05
  |  |--ORDaccess07
  |  |--ORDaccess08
  |  |--ORDaccess10
  |  |--ORDcore01
  |  |--ORDcore02
  |--@junos:
  |  |--MCOcore01
  |  |--MCOcore02
  |--@nxos:
  |  |--MCOaccess03
  |  |--MCOaccess06
  |  |--MCOaccess09
  |  |--ORDaccess03
  |  |--ORDaccess06
  |  |--ORDaccess09
  |  |--ORDagg01
  |  |--ORDagg02
  |  |--ORDagg03
  |  |--ORDagg04
  |  |--ORDdist01
  |  |--ORDdist02
  |--@ungrouped:
(ansible) ~/P/m/inventory_plugin »
Alternately, try the --list option
(ansible) ~/P/m/inventory_plugin » ansible-inventory -i csv_inventory.yaml --playbook-dir ./ --list
Everything appears neatly grouped correctly. Next we can add the variables like ansible_network_os and ansible_host for the hosts.
4. Adding the host variables
Finally, let’s update the code to add the ansible_host and the ansible_network_os variable using the Mgmt IP an Platform from the spreadsheet, respectively.
    def _populate(self):
        '''Return the hosts and groups'''
        self.inventory_file = self.inv_dir + '/' + self.inv_file
        self.myinventory = self._get_structured_inventory(self.inventory_file)
        #Create the location, function and platform  groups
        locations = []
        functions = []
        platforms = []
        for data in self.myinventory.values():
            if not data['Location'] in locations:
                locations.append(data['Location'])
            if not data['Function'] in functions:
                functions.append(data['Function'])
            if not data['Platform'] in platforms:
                platforms.append(data['Platform'])
        for location in locations:
            self.inventory.add_group(location)
        for function in functions:
            self.inventory.add_group(function)
        for platform in platforms:
            self.inventory.add_group(platform)
        #Add the hosts to the groups
        for hostname,data in self.myinventory.items():
            self.inventory.add_host(host=hostname, group=data['Location'])
            self.inventory.add_host(host=hostname, group=data['Function'])
            self.inventory.add_host(host=hostname, group=data['Platform'])
            self.inventory.set_variable(hostname, 'ansible_host', data['Mgmt IP'])
            self.inventory.set_variable(hostname, 'ansible_network_os', data['Platform'])
The final Python file should look like : https://github.com/termlen0/custom-inventory-plugin/blob/master/inventory_plugins/my_csv_plugin.py
This results in the hostvars being added as follows.
        "hostvars": {
            "MCOaccess01": {
                "ansible_host": "10.141.1.141",
                "ansible_network_os": "ios"
            },
            "MCOaccess02": {
                "ansible_host": "10.141.1.123",
                "ansible_network_os": "eos"
            },
            "MCOaccess03": {
                "ansible_host": "10.141.1.124",
                "ansible_network_os": "nxos"
            },
            "MCOaccess04": {
                "ansible_host": "10.141.1.125",
                "ansible_network_os": "eos"
            },
            ...
            }
Conclusion:
That’s it! Now let’s use this new inventory plugin along with a playbook to tie it all together. The playbook:
---
#playbook.yaml

- name: DISPLAY THE INVENTORY VARS
  hosts: nxos, core # These are dynamically generated groups from the plugin
  gather_facts: no
  tasks:
    - name: DISPLAY THE HOST VARS
      debug:
        msg: "The mgmt IP is {{ ansible_host }} and platorm is {{ ansible_network_os }}"
Run the playbook as follows:
(ansible) ~/P/m/inventory_plugin » ansible-playbook -i csv_inventory.y
aml playbook.yaml

PLAY [DISPLAY THE INVENTORY VARS] ************************************
**********************************************************************
**

TASK [DISPLAY THE HOST VARS] *****************************************
**********************************************************************
**
ok: [ORDagg01] => {
    "msg": "The mgmt IP is 10.122.1.118 and platorm is nxos"
}
ok: [ORDagg04] => {
    "msg": "The mgmt IP is 10.122.1.121 and platorm is nxos"
}
ok: [ORDagg02] => {
    "msg": "The mgmt IP is 10.122.1.119 and platorm is nxos"
}
.
.
.
ok: [ORDcore02] => {
    "msg": "The mgmt IP is 10.122.1.115 and platorm is ios"
}
ok: [MCOcore02] => {
    "msg": "The mgmt IP is 10.141.1.115 and platorm is junos"
}
ok: [MCOcore01] => {
    "msg": "The mgmt IP is 10.141.1.114 and platorm is junos"
}
...<output ommited for brevity>
Hope this helped with your understanding of how to write a custom inventory plugin for Ansible. If you follow a different workflow or have constructive improvements, I’d love to learn from you.